Building the 1:48 scale 35 Sqn C47TP Falcon
My name is Stewart Moon and I am an ex-SAAF member now living in the United Kingdom. I served from 1986 to 2001 and was based at Air Force Base Durban and Forward Air Command Post Durban (FACP DBN).
On 24th February 2013 I purchased myself a Revell 1:48 scale C47 Skytrain model. I wanted to build myself a C47TP but to do that, I would have to do a conversion from the original DC3 piston engine, 3 blade propeller, to an extended Turbo Prop engine cowling and a 5 blade propeller. I thought it would be quite easy. Oh how wrong I would be. If I had known how difficult it was, I would have stuck to the standard DC3/C47.
I first started on the Internet and eBay looking for a C47TP conversion kit. Hours of surfing the internet turned into weeks and I was coming up empty handed. There was nothing in a 1:48 scale. So I contacted Red Bear Resin who was selling the conversion kit for the 1:48 scale Basler BT67, similar to the C47TP. I also contacted The SAAF Museum.
There was a conversion kit for a C47TP but only in a 1:72 scale and not in a 1:48 scale. So I continued to surf the Internet and came across a company in Thailand who built wooden desktop models. They agreed to make the engines and the 5 blade props from wood if I could supply them with pictures and dimensions. Everything was going well. The work on making the 2 engines plus the 5 blade propellers would take approximately 2 weeks and 4 weeks to arrive in the UK.
Then disaster struck, the company decided there was too much of a risk, worried that their representation would be on the line if the engines did not work out. So it was back to the drawing board, sending out loads of emails to companies asking if there was anyone out there that could make my two engines. No luck. The only way around this, was to build the two engines myself from scratch. This is my story on How I Overcame The Odds And Built The First Ever 1:48 Scale 35 Squadron C47TP Falcon.
STATISTICS
1. All hand painted
2. Both engines were handmade
3. 218 hours to build and paint
4. 345 hours on the Internet
5. £145.00 to make (approximately R2100.00)
6. Started on 27 February 2013
Finished on 28 May 2013
THE BUILD
The model came moulded in a light grey colour.

After deciding what colour scheme, I spray painted the fuselage, wings, rudders, tail and flaps in a dark blue paint.
Then I marked out the wings and flaps with masking tape to represent the white markings.

Hand painted with 3 layers of white model paint.
I then built and painted inside the cockpit.

Then started on the South African Flag on the tail. This took quite some time to complete as each colour was individually painted with 3 coats of model paint.

During this time, I was working on a few drawings for the two turbo prop engines.

I then started to make stencil cut outs of the falcon that would later be hand painted with 3 coats of paint onto each side of the fuselage. This took a great deal of time, patients and a very steady hand.

Spent approximately 3 weeks on the falcon but well worth the effort as it looks great on the aircraft. I was still trying to find a company to make my two engines. I did consider the Basler BT67 conversion kit but opted out.
It would be down to making the engines myself from scratch. I sketched up a few more drawing with dimensions. The best way to build the two engine cowling’s would be out of Balsa wood.

So I purchased a block of balsa 50mm x 50mm x 250mm.Measured out each engine then slowly carved and sanded down until the engines came into shape. I left a section at the back to allow the engine to fit snug into the wing section by the wheel bay.

The engines would later be resined with 3 coats and painted. The next stage was to drill holes on both sides of the engines to allow for the exhausts which I made out of spare piping from the kit, cut, heated up and bent into shape.

They were then pushed into place and secured with resin. I was unable to find them on the internet. The astrodome was removed, filled in, sanded down and spray painted dark blue. Once the engines were shaped and sized, I started coating them with three layers of resin. Each coat having to dry before applying the next coat. Final stage was to spray paint both engines.

Again 3 coats were applied.
THE 5 BLADE PROPELLERS
The 5 blade turbo propellers was the combination of a 1:48 scale 5 blade Spitfire XIV and the spinner the 1:72 scale Spitfire XIV. The holes on the spinner had to be drilled bigger to allow for the 1:48 scale blades to fit comfortably. The blades were then fixed and glued into place making up the 5 bladed C47TP.

They were later painted in the correct colour scheme.
THE UNDERCARRIAGE
I bought the metal 1:48 scale undercarriage/landing gear from America to fit Revell models. They were later glued and resin onto the wing mounts. The wheels were painted and fixed into place.

The rear tail drag wheel snapped into place.
INSTALLING THE TAXI LIGHTS
An additional feature to my C47TP was to put taxi lights into the wings, so they could work like real thing when turned on. Using the wing support strut, I glued an extra piece of wood. I then drilled 2 holes into the wood (making sure they lined up with the holes in the wing) Then placed 2 micro light bulbs into the holes. Wired up the lights to a switch and battery underneath the main wing.

Once switched on they looked like the real thing.
THE FINAL ASSEMBLY
After almost 3 months of building, carving and painting it was time to put everything together.

I first attached the 2 engines to the wings.

I then attached the wings to the fuselage.


Once everything was dried, I attached the two 5 blade turbo propellers, given me my almost finished 1:48 scale 35 Squadron C47TP Falcon.

All that remained now was to glue on the three antennas and place decals onto the fuselage.


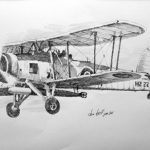
The completed 1:48 scale C47TP taken on 28 May 2013 (My 50th Birthday)
I am assuming this is a one of a kind in the world in this scale and colours?
So……..
You ask, why did I made this model?
I heard on the news about the C47TP that cashed in the Drakensberg on 6 December 2012 and all SANDF members were killed.
Well……..
I made this model to remember those poor souls that lost their lives that day. R.I.P. Guys. You will always be remembered, as I have something to remember you all by.
It was a pleasure and an honour to build this model.
GOD BLESS.
Stewart Moon